Corsair 1000D Mega-Build Update 3: Break It Down (Video)
August 10, 2018 | 15:00
Companies: #corsair
Whilst it was great to have the chance to sun ourselves for a while, basking in the ridiculous heatwave, it's also about time we jumped into the meat of this project log, but if you need a catch up, here are the preceding parts, each with a video:
He's dead, Jim
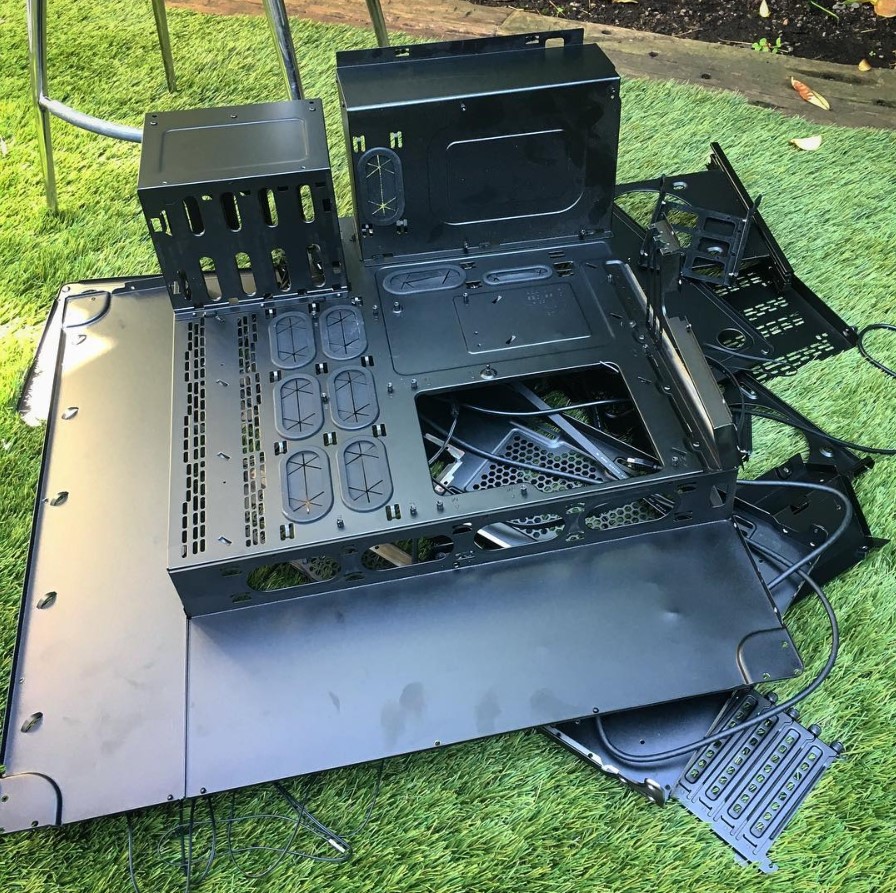
If you've ever stumbled upon one of my project logs before, you'll likely have noticed I've got a bit of a thing for tearing up cases, and the 1000D is no exception here. The plans for this case mod necessitate removing almost the entire interior structure and replacing it. Now, I know that this does start to stray dangerously close to the scratch-build territory, but sometimes you gotta do what you gotta do. With this mod, we wanted the case to be unmistakably a 1000D, in that if you see it in pictures or at a show, you know what it started life as. With that said, the 1000D is entirely a big, black, glass box with some black aluminium thrown on for good measure, and the inside itself doesn't lend a huge amount to the case other than the signature side-by-side 120mm fan mounts in the front (and optional top). So, to maintain the identity, all you really need to do is keep the glass and the aluminium.
So, how do you do it?
Thankfully, tearing down a case is rarely rocket science. The vast majority are made from riveted steel, so all you need is a trusty drill and a suitably sharp drill bit. This is where the 1000D does start to grate with me and should help display why I've opted to bin most of it. This is a very non-modular case. Due to the sheer scale of it, a large quantity of structural integrity comes from the internal panelling. As such, almost everything's riveted together. Removing the feet was simple, as they screw in from underneath. The radiator rails were a little fiddly, but again just screw into position, and I've saved those for future use, as the runners are actually quite nice.
The first issue is the HDD cage. It's a very prominent feature of the case, but I don't really know why, nor do I understand why it's riveted in place with quite so much vigour. I actually decided to give up on removing the pieces bit by bit as there are so many rivets, so instead it seemed best to attack all the rivets along the outside of the panels. Given it was pushing 32°C outside, this was quite the experience. Eventually, all the rivets were gone and I was able to lever out the interior panels in one go.
As you would expect, there's little to no structural integrity at this point given only three basic sides are left. Fear not: After shooting the video, the case was promptly rotated so that it wouldn't skew the front panel. Whilst I wouldn't necessarily expect a fully modular design, I must admit I was fairly disappointed by how much work had to be done to a case at this price point to get it to that level. I would have hoped to see more sections that simply screw into place. This is particularly true of the HDD cage, power supply shroud, and blanking plates that connect the large motherboard tray area to the edges of the case. Not being able to remove these areas without drilling into the chassis seems like an oversight given the nature of the setups likely to go into such a behemoth.
Where to next?
With the case now completely gutted, it's finally time to repopulate it. The next update will involve the start of this process where we'll be machining the first of the many panels going into the build.
RELATED ARTICLES


MSI MPG Velox 100R Chassis Review
October 14 2021 | 15:04

Want to comment? Please log in.