
How to reuse an old waterblock
Water-cooling kit is expensive, and unlike the other hardware in your PC it isn’t based on technology which is rapidly evolving. Manufacturers do refine their designs over time, but you don’t often see big leaps in performance as you did, say, with the move from Core 2 Duo to Core i7, or from a hard disk to SSD.Unfortunately, while a good CPU and GPU waterblock is worth holding on to, they’re often designed for specific hardware, which can mean that you need a replacement when you upgrade your motherboard or graphics card.
If you’re lucky you’ll be able to go out and buy a replacement clamp for a few pounds, however for some blocks this won’t be an option, or you might find the manufacturer is charging a ludicrous amount of them.
If this is the case then you can always make your own, and you might be surprised how easy it is to do.

A selection of tools which will come in handy when modding a waterblock
Manufacturing your own retention mechanism is quite easy, doesn’t require specialised tools and the materials are cheap. If you take your time and make accurate measurements and cuts then you’ll be rewarded with a clamp that’s as effective as the original model.
Copying the design
 Perhaps the most obvious approach to making a new clamp for an existing waterblock is to simply copy the original design’s approach, and adapt it to fit a new motherboard layout. In a few cases this is by far the best way to go about the job – for example the old D-Tek White water blocks (right) use a clamp that sits between the water-block and motherboard. This setup is very simple and can be copied directly with a new sheet of metal. All you need to be done is adapt the location of the motherboard mounting points.
In other cases – perhaps if your block uses an old AMD 939 bracket mount – then a straightforward copy may not be possible. In these situations the best course of action to take is to make a simple pressure-clamping mount.
These are the simplest mounting you can make. Essentially, you’ll cut a flat plate to match the top of the water-block and then attach it to the motherboard with four long screws.
You can then carefully tighten the screws to apply an even clamping pressure to the block. Although the design and method are both very simple this will allow you to apply as much mounting pressure to the water-block as you like.
New screws
If you’re lucky you’ll be able to use the old nuts and bolts from your previous mount. However if your previous mount had none, or they’ve been misplaced you’re going to have to find a new set.Fortunately you don’t need special screws, or anything esoteric to simply clamp a water-block down to a CPU. You need four steel bolts; M3 bolts are best as they fit the motherboard mount holes perfectly. Don’t use anything larger than M3 as you’ll need to drill out the motherboard, which will not end well.


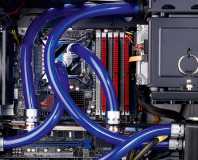
Left: protect your block while you're working; Right: We want to make a plate that will be securely attached to the motherboard, to balance the pressure over the whole block
You’ll need four bolts, at least 30mm long. If you want to use springs to balance out the mounting pressure between the bolts you’ll need to go as far as 40-60mm depending on the springs and the height of your block. The general rule is to buy longer bolts and then cut them down to the size you need.
As well as your bolts you’ll need eight M3 nuts and at least eight plastic washers. The four nuts securely attach the bolts to the motherboard, and the eight plastic washers protect the motherboard from scratches and shorts. If you can’t find plastic washers you can easily make your own from a thick plastic – yoghurt pots and other food or drink containers make excellent donors. Just push a hot bolt through to make the centre hole and trim the ‘washer’ out with a pair of scissors.
The other four nuts are to be used to push down against the clamping plate. If you want to use springs to balance the compression then large washers will be required at each end of the spring. This will stop the spring sticking and digging into the clamping plate or popping over the nut.
RELATED ARTICLES


MSI MPG Velox 100R Chassis Review
October 14 2021 | 15:04

Want to comment? Please log in.