
The test setup
The watercooling tests are conducted on our watercooling test bench, which features the following components, chosen for maximum stability with maximum overclockability:- Motherboard – Gigabyte P35C-DS3R
- CPU – Intel Core 2 Quad Q6600 @ 2.4GHz (unless noted)
- RAM – OCZ FlexXLC PC-9600 DDR2 @ 1066MHz (unless noted)
- GPU – OCZ GeForce 8800 GTX
- HDD – Seagate 1TB 7200.11 SATA
- PSU – Silverstone ST-50EF Plus 500W
All clocks are at manufacturer stock speeds unless specifically noted as part of an overclocking test.
Along with the hardware, some amount of watercooling gear is chosen. This can vary by the testing setup depending on what is being tested at the time. In the case of this test we are using:
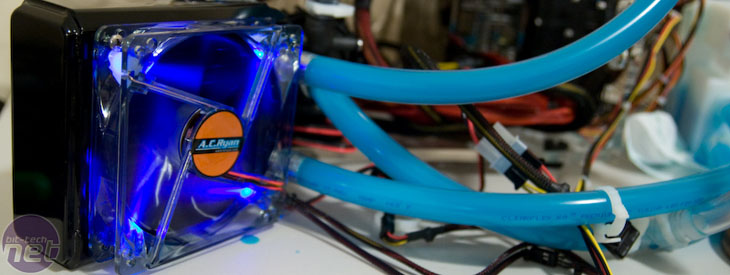
- CPU Block – D-Tek FuZion 2.0
- GPU Block – Danger Den 8800GTX Waterblock
- Fans – One, two, or three 120mm AC Ryan Blackfire 4 Kameleon fans, as fitting on the radiators.
- Pump – Laing Vario D5 12v @ max setting
- Tubing – 1/2" ID Clearflex
- HW Labs Black Ice GTX series - 120mm, 240mm, 360mm;
- The Feser Company TFC X-Changer series - 120mm, 240mm, 360mm.
Testing Methodology
Understanding the test methods is vital to understanding the results of a test, as well as allowing maximum repeatability. Here at bit-tech we strive to make our tests fair, unbiased, and repeatable by anyone with the time or inclination to do so. The following methods and assumptions were used in this test:The test setup is built in a climate controlled room free of unnecessary clutter. Once assembled, the system was started on air cooling and the operating system (Windows Vista SP1) was patched fully. Speedfan 4.34 was used to measure the temperature of the CPU cores before, during and after testing as prescribed below. Ambient temperatures were also taken from a digital thermometer on the wall approximately one metre from the test setup.
For this test, Ambient room temperature was 22 degrees Celsius.
The system was booted with CPU and GPU blocks along with the radiator being tested, and left to idle at the desktop (no screen saver) for one hour to allow the fluid temperatures to come to equilibrium, and temperature was then recorded.
Prime95 was then started on each core using Small FFT to assure maximum CPU usage, which was also monitored via a sideboard widget to assure proper load. Temperatures were recorded at 10, 20, 30, and 60 minutes and averaged. No cores showed any significant change in temperature (greater than one degree) after 20 minutes. Once 60 minutes passed, Prime95 was stopped on all cores and the system was allowed to return to idle. Temperatures were recorded at 10, 20 and 30 minutes though no readings showed deviations past 10 minutes.
The system was then shut down and drained. The radiator was removed, and replaced with the next in series. This sequence was continued until all radiators had been tested. For reference purposes (if anyone truly cares), the tests went in the following order: Black ice 360, X-Changer 360, Black Ice 240, X-Changer 240, Black Ice 120, X-Changer 120.
Upon completion of this, the test was restarted from scratch. Results were averaged amongst the two runs to develop the reported findings on the next page.
As an additional note, the CPU and GPU were not moved or altered to maintain testing integrity. The radiator path is designed such that removing the radiator would not cause any additional movement or reseating of either block. By carefully managing subtle issues, all changes in temperature will be accountable to the radiator only.
RELATED ARTICLES


MSI MPG Velox 100R Chassis Review
October 14 2021 | 15:04

Want to comment? Please log in.