
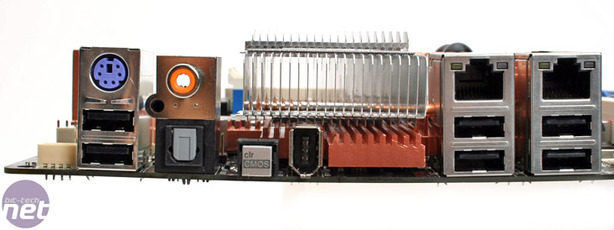
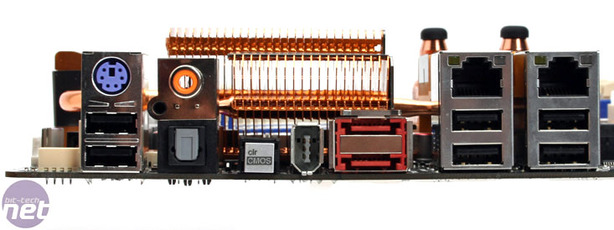
Rear I/O
The rear I/O panels for both Formula and Extreme are almost identical; they both have PS2 keyboard, six USB 2.0, one 6-pin Firewire socket, coaxial and optical S/PDIF out, two RJ45 sockets for dual Gigabit Ethernet and a clear CMOS button. At the very end there's a little white plug socket for the desktop LCD readout as well.The Extreme has slightly different heatsink over the rear I/O that it doesn't have a secondary one underneath like on the Formula. Instead Asus manage to squeeze in a couple of eSATA ports instead. After discussing this with Asus we were told that no eSATA on the Formula was because the gaming/enthusiast brand didn't need it - eSATA was more along the lines of the P5E3 range.
OK, that's fair enough we thought, but then we received the Extreme which is arguably more enthusiast and it does have eSATA. This has left us slightly confused.
The extra bit of heatsink on the Formula could easily of been done without, so it looks like Asus is just trying to save a few pounds by not including it. As much as we encourage the use of bigger heatsinks that don't impede on the CPU area, the rear I/O space is just as limited and should therefore be as fully utilised as possible, especially when both boards cost as much as they do.
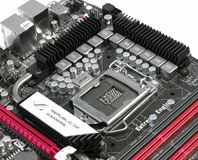
Asus Maximus Formula
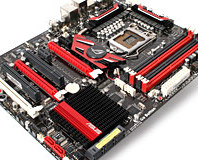
Asus Maximus Extreme
BIOS

Fortunately for people like you (and unfortunately for people like me) there's a tonne of BIOS options to rifle through. It's no DFI BIOS, so I didn't have to spend a fortnight decoding it for you, but there's still enough to keep even the most dedicated user happy. The Formula BIOS is very much like the Extreme (seen in the pictures), but it has fewer board specific features. The core functions and changes are still the same on both boards.
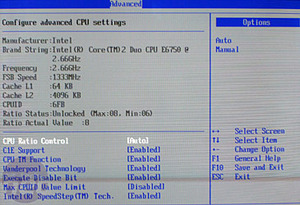
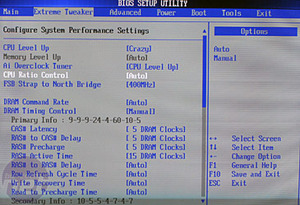
Most amusingly you can now set your CPU to mimic other Intel CPUs with the "CPU Level Up" function. For example, if you have a Q6600 (like I imagine many of you do), then you can set it to QX6850 just by flicking the single option. The "Crazy" value is another auto-overclocking value but it'll really bump up your CPU speed - again just this single setting changed our E6750 from a stock 2.66GHz to a whopping 3.51GHz with a 437MHz FSB! Obviously, your mileage will vary but Asus basically does all the hard work for you, and while this isn't a new-new feature I can't remember the last time I've had an auto-OC tool successfully almost give me an extra GHz of performance, outstripping many of the stable hand-tweaked overclocks out there.
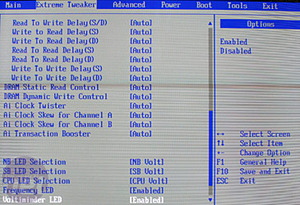
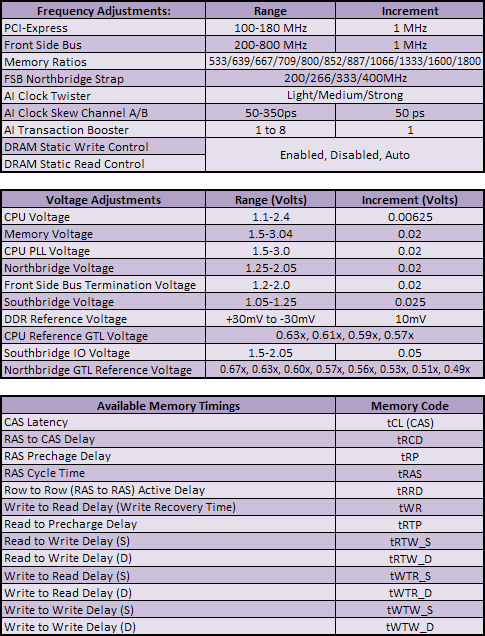
The memory timings are split into primary and secondary groups as is now usual for Asus boards AMI BIOSes, and you get the new "AI" memory write controls, Transaction Booster, Clock Twister and Skew values. I've found the clock twister to work quite well but have never been able to use the Transaction Booster stably. The Clock Skew can offset the clock generators for front side bus and memory controllers so they don't form constructive or destructive waves, making a system unstable, but without a professional oscilloscope to know if the values you set are actually working positively, I'd just leave this alone.
With the exception of the "manual" setting, every global preset hides many of the more hardcore options away from the user. We find that this is a better system at keeping things simple for the layman than Gigabyte's Ctrl+F1 trick, which is simply just annoying for anyone that isn't a novice.
Describing the voltage settings as "very liberal" seems like too much of an understatement. Outright insane is more the correct term - 3V on DDR3, 2V for the northbridge and nearly 2.5V on a 1.2V CPU!? Since when do we really need that kind of voltage overhead?? About 0.01 percent of users will actually use some crazy ass voltage with LN2, so is it worth the extra development time and/or more expensive components? Or is it just more marketing e-peen?
The LEDs dotted about the board represent different voltage settings and can also be changed in the BIOS. For example, the "NB LED Selection" can show a colour value (green = safe, red = high/dangerous etc) for either the northbridge voltage or front side bus termination voltage. I like this concept but the execution is terrible - the LEDs are dotted everywhere, so I found myself having to look over and around large graphics cards, sticks of memory, cables and heatsinks to see them.
They don't tell me any values outside of the BIOS and I know they are either safe or dangerous simply because I set them in the BIOS to begin with. Ideally they all need to be brought together and put on the LCD panel that sits on the desk - that way you can keep an eye on all the voltages, temperatures, CPU speed, etc. no matter what you're doing on the PC. That also doesn't take up extra software resources like Asus PC Probe II (or any similar software) does.
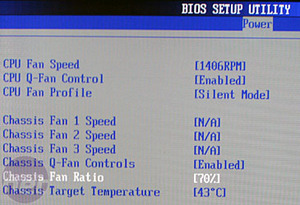
On the subject of the LCD panel - after it has shown you what happens during POST all it then just reads out the current time. There is a "user string" option although I've not found any provided software to make use of it. Finally there's also the Q-Fan control that adjusts fan speeds according to either silent or performance modes or it can make the fans work towards target temperatures.
RELATED ARTICLES


MSI MPG Velox 100R Chassis Review
October 14 2021 | 15:04

Want to comment? Please log in.