
The stock air coolers supplied with retail processors from Intel and AMD may be fine for the average PC user but, generally speaking, PC enthusiasts have expectations that are well above the 'one size fits all' approach. Thus, a stock cooler could never hope to satisfy the needs of a budding hardware fanatic.
At one end of the spectrum, noise reduction may be the greatest concern – this is an area where both Intel and AMD have improved dramatically over the years, but their cooling solutions still aren’t as close to silent as possible. The other extreme is the overclockers amongst us, where maximum cooling is required to stop temperatures being the limiting factor in your latest overclocking endeavour.
To some extent, there has been a bit of convergence in the heatsink market over the last few years, as high-performance heatsinks have become much quieter than they used to be (anyone remember running 60mm Delta screamers? – Ed). This is mainly thanks to heatpipe technology, which has enabled heatsink manufacturers to remove heat from the CPU in a more effective manner.
Today, we have a selection of coolers from Asus, Noctua, ThermalFly and Zalman on test. Each of these coolers makes use of heatpipe technology to some extent and whatever your needs are, there should be something here that might be right up your street in this selection.

We installed the processor in an Asus P5WD2-E motherboard with a passively-cooled Sapphire Radeon X1600 Pro and 1GB of RAM. We chose this particular motherboard because there is a decent amount of space around the CPU socket and that means we shouldn’t encounter any problems when it comes to installing the larger heatsinks. However, in order to gauge whether a particular heatsink is suitable for a wide range of motherboards, we had many motherboards on hand in the bit-tech offices.
Before we started, the Pentium XE 955’s heatspreader was lapped because we found the contact in the centre was incredibly poor and sometimes resulted in system instabilities. We used a quick curing ‘Lumière’ thermal paste from Arctic Silver with all of the heatsinks, except for those that come with pre-applied thermal interface material.
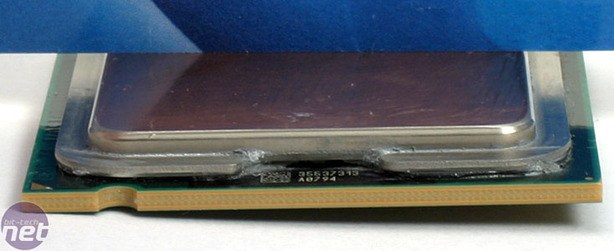
Our lapped 955XE chip
The ambient temperature was taken at a fixed position, one metre away from the system. Our offices are temperature controlled, so we tried our best to keep the environment as constant as possible. With this in mind, our office air conditioning was set to a constant 26°C.
Once the heatsink was installed and the temperature probes were set up, we set the system up ready for loading. At this point, we loaded the two processing cores with Orthos and unplugged the CPU fan. This allowed us to reach higher temperatures much faster in order to find out a heatsink's maximum load temperature.
Using this methodology, we plugged the fan back in as soon as the CPU temperature reached 75°C and then waited for the temperature curve to level off. After around 15 minutes of Orthos load with the fan plugged in, we then recorded the ambient temperature, PWM temperature and then finally the CPU temperature.
At this point, the load was then removed and the CPU temperature was left to settle down. Once the CPU temperature had stabilised, we recorded the ambient temperature, PWM temperature and then the CPU temperature to give us our idle readings.
In order to ensure that our results were as accurate as possible, we ran all of our tests three times with each of the heatsinks. This process included completely removing the heatsink from the board before reinstalling it again (we also reapplied the TIM if it wasn't pre-applied).
At one end of the spectrum, noise reduction may be the greatest concern – this is an area where both Intel and AMD have improved dramatically over the years, but their cooling solutions still aren’t as close to silent as possible. The other extreme is the overclockers amongst us, where maximum cooling is required to stop temperatures being the limiting factor in your latest overclocking endeavour.
To some extent, there has been a bit of convergence in the heatsink market over the last few years, as high-performance heatsinks have become much quieter than they used to be (anyone remember running 60mm Delta screamers? – Ed). This is mainly thanks to heatpipe technology, which has enabled heatsink manufacturers to remove heat from the CPU in a more effective manner.
Today, we have a selection of coolers from Asus, Noctua, ThermalFly and Zalman on test. Each of these coolers makes use of heatpipe technology to some extent and whatever your needs are, there should be something here that might be right up your street in this selection.
How We Tested:
In order to establish how well each of these heatsinks performed, we set up a worst-case scenario using one of the hottest-running processors ever released. Intel’s Pentium Extreme Edition 955 is a dual-core chip that is based on the 65 nanometre Presler core (two Cedar Mill dies on the same chip package). It runs at a lofty 3.46GHz and, according to Intel, the chip has a TDP of 130W – that’s the same TDP as Intel’s current flagship Core 2 Extreme QX6700 quad-core processor.We installed the processor in an Asus P5WD2-E motherboard with a passively-cooled Sapphire Radeon X1600 Pro and 1GB of RAM. We chose this particular motherboard because there is a decent amount of space around the CPU socket and that means we shouldn’t encounter any problems when it comes to installing the larger heatsinks. However, in order to gauge whether a particular heatsink is suitable for a wide range of motherboards, we had many motherboards on hand in the bit-tech offices.
Before we started, the Pentium XE 955’s heatspreader was lapped because we found the contact in the centre was incredibly poor and sometimes resulted in system instabilities. We used a quick curing ‘Lumière’ thermal paste from Arctic Silver with all of the heatsinks, except for those that come with pre-applied thermal interface material.
Our lapped 955XE chip
Temperature Measurement:
For measuring the CPU temperature, we recorded the temperatures using the on-board sensors via Asus' PC Probe system monitoring software. In addition, we also recorded PWM and ambient temperatures using a Maplin 501 K-type digital thermometer. This is accurate to 0.1°C between -50°C and 1000°C.The ambient temperature was taken at a fixed position, one metre away from the system. Our offices are temperature controlled, so we tried our best to keep the environment as constant as possible. With this in mind, our office air conditioning was set to a constant 26°C.
Software & Configuration:
In addition to using Asus PC Probe to monitor CPU temperatures, we also used SpeedFan as a second temperature monitoring tool. Load came in the form of Orthos, which was set to load both CPU cores (HyperThreading was disabled) using a large in-place FFT calculation. Finally, in order to make sure the CPU wasn't throttling, we used RMClock to monitor the processor's power states.Once the heatsink was installed and the temperature probes were set up, we set the system up ready for loading. At this point, we loaded the two processing cores with Orthos and unplugged the CPU fan. This allowed us to reach higher temperatures much faster in order to find out a heatsink's maximum load temperature.
Using this methodology, we plugged the fan back in as soon as the CPU temperature reached 75°C and then waited for the temperature curve to level off. After around 15 minutes of Orthos load with the fan plugged in, we then recorded the ambient temperature, PWM temperature and then finally the CPU temperature.
At this point, the load was then removed and the CPU temperature was left to settle down. Once the CPU temperature had stabilised, we recorded the ambient temperature, PWM temperature and then the CPU temperature to give us our idle readings.
In order to ensure that our results were as accurate as possible, we ran all of our tests three times with each of the heatsinks. This process included completely removing the heatsink from the board before reinstalling it again (we also reapplied the TIM if it wasn't pre-applied).
RELATED ARTICLES


MSI MPG Velox 100R Chassis Review
October 14 2021 | 15:04

Want to comment? Please log in.