How to set up multiple Folding clients
If your PC has sufficiently powerful hardware, you can fold on its CPU(s) and GPU(s) at the same time. However, bear in mind that, despite Nvidia’s bullish claims about the CPU now being redundant, the GPU folding client still requires a fair amount of CPU resources to fold optimally.Whether you choose to install multiple-console or multiple-system tray clients, you need to follow a very specific setup procedure. If you don’t follow these instructions then the clients will overwrite each other’s data, causing none of them to work correctly.
If you choose to run multiple folding clients on one PC then you need to be aware of a few issues. Firstly, by default, the Windows clients store some information in the Registry, which can cause problems with multiple clients, as they’ll try to overwrite each other’s data. To fix this problem, you need to run each client with the ‘-local’ flag at the end of the shortcut. This flag forces the client to store everything in the directory in which it’s installed so that it won’t interfere with other clients.
In addition, each folding client needs to be allocated its own unique machineid, a numerical value between 1 and 16. With the console clients, the machineid is configured when you run the client for the first time.
 For the system tray clients, select the machineid from a drop-down menu in the Advanced tab of the Control Panel. Although you may have added the ‘-local’ flag to each client, if you don’t give each a unique machineid, then the secondary clients will refuse to run.
Whichever type of client you’re configuring, you also need to make sure that you enter the same username and team number in each client. If you don’t, any completed WUs will be credited to another user. You need to enter the team number correctly too (35947 for Custom PC and bit-tech), although there can only be one person with the same username per team, the same username can be used in different teams and you don’t want to contribute to the wrong team.
If you want to run multiple GPU clients on a single system then you need to set two additional flags in each client: ‘-gpu’ and ‘-forcegpu’. The ‘-gpu’ flag is used along with a numeric value – for example, ‘-gpu 3’ – to tell Windows it has multiple GPUs that can each be individually addressed. Each GPU client should be given its own unique gpu number, in ascending order, starting at 0.
The ‘-forcegpu’ flag is supposed to be used to force the client to recognise troublesome GPUs, although it’s worth adding it on every system. The syntax for this flag is to add ‘ati_r600’, ‘ati_r700’ (depending on which generation of ATI GPU you have) or ‘nvidia_g80’ (regardless of whether you have a GeForce 8, 9 or 200-series GPU) to the end of the shortcut, depending on whether your graphics cards have ATI or Nvidia GPUs.
You also need to make sure that CrossFire or SLI is disabled in the ATI Catalyst Control Center/Nvidia ForceWare control panels if you want to fold on every GPU. If you play games on your PC, don’t forget to re-enable CrossFire/SLI when you start gaming.
Vista users have one more hurdle to jump when folding on multiple GPUs, as the OS disables any GPUs not connected to an output device. You can get around this problem by connecting the additional GPUs to another monitor and extending the desktop, or installing a dummy plug, which tricks the graphics card and Windows into thinking that it’s connected to a monitor. You can buy dummy plugs on eBay but they’re very easy and cheap to make.
Example: Running multiple-GPU console clients
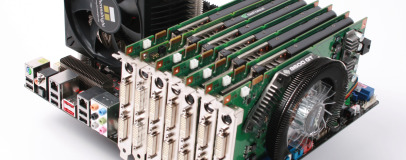
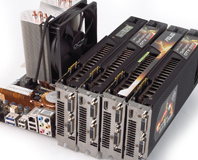
As each folding client needs to be run from its own directory, the first step is to unzip the GPU console files into a directory. In this example, we unzipped the files into a directory called ‘gpufolding1’ in the root directory of the hard disk. We then copied and pasted this directory three times (for each of the four GPUs in our test system). We then renamed each of the copied folders so that they were named ‘gpufolding2’, ‘gpufolding3’ and ‘gpufolding4’.As our test system had four Nvidia-powered graphics cards, we then created a shortcut for each of the four folding clients as follows:
First client: c:\gpufolding1\folding@home-win32-gpu.exe -local -gpu 0 -forcegpu nvidia_g80
Second client: c:\gpufolding2\folding@home-win32-gpu.exe -local -gpu 1 -forcegpu nvidia_g80
Third client: c:\gpufolding3\folding@home-win32-gpu.exe -local -gpu 2 -forcegpu nvidia_g80
Fourth client: c:\gpufolding4\folding@home-win32-gpu.exe -local -gpu 3 -forcegpu nvidia_g80
Example: Running multiple-GPU system tray clients
Alternatively, you can run multiple-GPU system tray clients on a single system. Once you’ve downloaded and installed the correct version of the GPU system tray client, you need to follow the following procedure to set them up correctly.1. Ensure that the client isn’t set to automatically start. Look in the Startup folder in the Start Menu. Then enable ‘show hidden files and folders’ in Explorer’s Tools/Folder Options menu.
2. Using Explorer, find the directory in which the client has created a folder under your username. This will be (Replacing ‘username’
with the name of your Windows user account username) Windows XP : c:\documents and settings\username\application data\
Windows Vista: c:\Users\username\appdata\roaming\
3. Once you’ve found it, copy the folder called ‘folding@Home-gpu’ and paste it into the same location. Rename these GPU2, GPU3 and so forth.
4. Navigate to the folder ‘C:\Program Files\Folding@Home\Folding@Home-gpu’ folder and find the exe file called ‘folding@home’. If you’re using a 64-bit version of Windows, it will be located in the x86 folder. Right click on it and select ‘create shortcut’. Then rename the shortcut GPU1.
5. Right click the GPU1 shortcut, select Properties and replace the ‘Start In’ path with the name of the folder you found in step 4.
Windows XP: c:\documents and settings\username\application data\folding@home-gpu
Windows Vista: c:\users\username\appdata\roaming\folding@Home-gpu
Make sure that there are quotation marks at the start and end of the ‘Start In’ path.
6. Add the following flags to the end of the Target path: “C:\Program Files\Folding@home\Folding@home-gpu\Folding@home.exe” -local -gpu 0
7. Copy and paste this shortcut to your desktop for the number of GPUs tin your PC. Rename the shortcuts ‘GPU1’, ‘GPU2’ and so on.
8. Amend the Target and Start In paths of the shortcuts of GPU2 onwards so that they point to the folders you created in step 3. (“C:\Program Files\Folding@home\Folding@home-gpu\Folding@home.exe” -local -gpu 1)
You need to increase the -gpu number for each client and change the ‘Start in’ folder to the correct folder.
8b. If you're running Vista or Windows 7, you need to span your desktop to screen 3 (even if you haven't got a screen 3) in order to get multiple GPUs folding. Right-click on the desktop, click Personalisation, then Display Settings and then click on screen 3. Then click Extend Desktop to the Screen and hit OK.
9. Double click your last GPU shortcut, and enter your username and team number (35947). In the Advanced tab, make sure that
you select the Core Priority to ‘slightly higher’. Don’t lock the cores to specific CPU[s] and change the machine ID to the number above the GPU number (GPU1 - ID2, GPU2 - ID3, GPU3 - ID4, GPU4 - ID5).
RELATED ARTICLES


MSI MPG Velox 100R Chassis Review
October 14 2021 | 15:04

Want to comment? Please log in.