
Installation
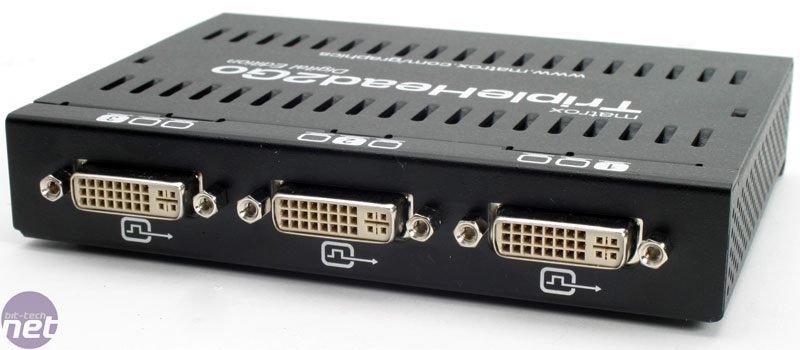
If you’re familiar with the original TripleHead2Go, it wasn’t as simple as it should have been when it came to installing the device and connecting the monitors. However, thanks to the increased size of the Digital Edition, Matrox has alleviated all of the potential confusion, as the ports to connect all three monitors to are in a single line on the one side.As you’d expect, you connect the left-most display to the DVI port on the left hand side, the centre to the centre and the right hand display to the right DVI connector. Simple, huh?
If that wasn’t simple enough, Matrox has also numbered the ports too, just in case you try and install it upside down.
On the other side of the magic box, Matrox has given users the option of choosing between DVI and VGA. At first this would seem strange, but in order to support 3840x1024, you need a dual-link connection because there isn’t enough bandwidth available over a single link.

Click to enlarge
Dual-link DVI ports on graphics cards only came in a couple of years ago on the desktop, and the technology isn’t particularly prevalent in notebooks either. Matrox decided that the best course of action would be to include a VGA port for those that don’t have dual-link DVI, thus allowing for a wider install base.
Once you’ve connected the monitors to the TripleHead2Go, and the TripleHead2Go to your graphics card’s display output, you will then need to connect the unit to a spare USB port. In terms of monitors, we used three 19” ViewSonic VX900-series displays, but in hindsight, we’d recommend using displays with bezels that are as thin as possible.
At this point, you are then ready to fire up your PC and boot into either Windows or Mac OSX. Currently, there is no driver support under Linux but Matrox does support 32- and 64-bit versions of both Windows XP and Windows Vista, along with Windows 2000 and Mac OSX.
As we’ve got a very early TripleHead2Go sample, we had to grab the drivers from Matrox’s site – we used Windows Vista Ultimate 32-bit for our testing and the latest drivers at the time of publication were released on 13th June. The Surround Gaming Utility version we used was released on 7th June.
The extra girth gives you a better experience, apparently...
In order to drive a massive resolution like 3840x1024, you’re going to need a top-spec PC and there is no shortage of high-end components in the bit-tech offices. We put together a system with an Intel Core 2 Extreme QX6800, 2GB of RAM and a single GeForce 8800 GTX in it and installed a selection of some of today’s most popular games.
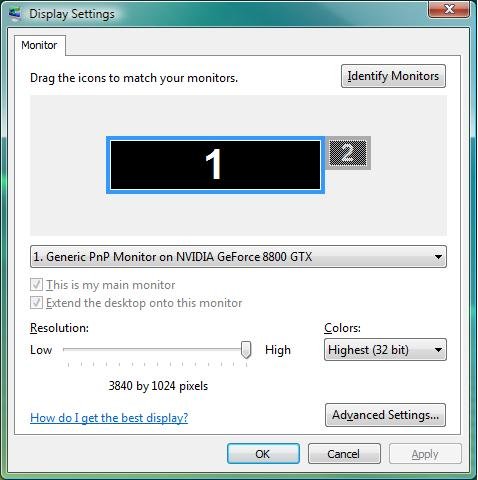
Once you’ve installed the drivers, you’ll have to reboot and then it’s time to start setting things up. The first thing we did was fire up the display settings pane in Windows Vista (right click on desktop -> personalise -> display settings). This gave us the option to move the slider all the way up to 3840x1024 without any extra configuration – this is good to see, as it means you can get a reasonable experience even without going through the configuration options.
RELATED ARTICLES


MSI MPG Velox 100R Chassis Review
October 14 2021 | 15:04

Want to comment? Please log in.