
When a company like Intel approaches you and asks you to make them a cool PC for the launch of their latest CPU, what do you say? Well duh! YES, of course.
That is exactly what happened here and so project "3GClear" was conceived. The project was a team effort. The case was designed by our very own MrHaz who also purloined the system components. The Case materials were cut and edged in America by Linear, VFD graphics coded by Cheese and the machining and assembly done by myself and MrHaz.
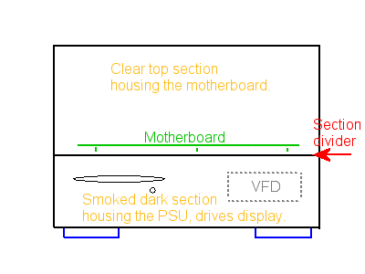
The case was to be made from Acrylic and be in two sections. A dark smoked bottom half housing the PSU and drives and a clear top section to show off the motherboard and 3GHz CPU. The idea being to showcase the new Intel processor at its World launch.
The project was beset with one major problem, that of time. We had one month to produce the goods. The first week was spent on the concept and basic case design. The next few weeks were spent waiting impatiently for the case materials to arrive. I ended up receiving the parts on the Wednesday night prior to the case being shipped to Intel the following Monday morning. This gave me the grand total of four days in which to finalise the design, cut the holes, assemble, iron out any design problems and produce the "modding extras" to make the case sparkle. (Actually 1 evening and 3 days). I should also mention that since the Acrylic was being shipped to the UK from America and we only had enough for one shot, one mistake and we were stuffed! Hmm, I love a challenge!
The photo record of this project is a little thin in parts, due to the pressure we were under to get the case finished in time. (Don't forget we had to install XP and test the system as well!). So any questions you may have can be answered here in the forum.
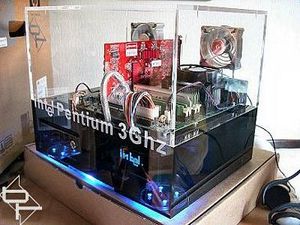
And here it is.
System specs:
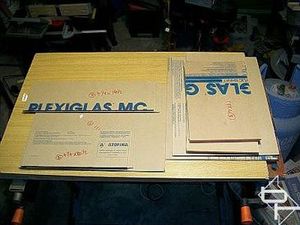
But let us start at the beginning. This is how it looked at the onset. A set of cut and edged pieces of 1/4" thick Acrylic sheet covered in thick protective paper. The second picture shows what we were aiming for.
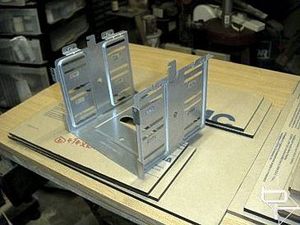
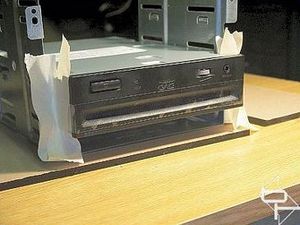
The first thing to do was sort out the drive mounting. I used a cage from an old disused case. Before starting, I sprayed the DVDs beige facia with black vinyl dye so it would blend in behind the smoked Acrylic. Because the DVD drive used was a slot loader, marking the slot position on the front of the case posed a problem. You see the bottom section of the case which housed the drives was smoked, not to mention covered in protective paper which I did not want to remove until absolutely necessary, so cutting the slot in the Acrylic in exactly the right position was not easy. I had to devise a way to mark its position on the case.
To do that I stuck a piece of clear sticky tape over the DVD disc slot with the sticky side facing outwards. The clear tape was held in place on the drive with low tack masking tape.
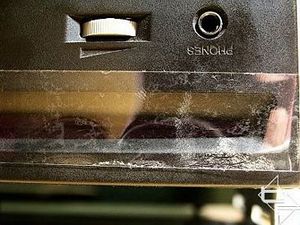
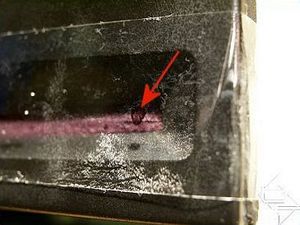
Here is a close up of the clear tape with the sticky side facing away from the drive. A marker pen was used to mark the clear tape, (on the sticky side remember), along the centre line of the DVD slot at each end.
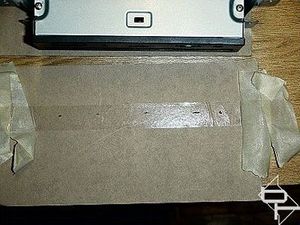
The drive was then offered up to the case front and positioned exactly. Pushing the drive so the sticky tape made contact with the paper covered Acrylic made it stick in place. Allowing me to peel the masking tape away from the drive and leaving the clear tape stuck to the paper with the slot centres marked in place. Neat eh?

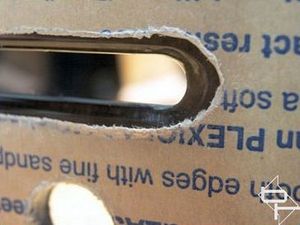
It was then an easy task to set up the router to cut out the slot. Because I had marked the tape at the ends of the drive slot, it was just a matter of routing from one dot to the next. The router was also used to bevel the edge of the slot which was finally polished to give a professional finish. A brief word about routing the Acrylic would be in order here. Routers by their nature are high speed cutting tools. High cutting speed = heat = bad for Acrylic, (it melts or fractures). Routing on a lower speed to reduce the heat generated results in rough cut edges. To get around the heat problem we used water, sprayed on the Acrylic. This worked a treat!
WARNING: Water and power tools do not mix! The mains supply used was protected with earth leakage protection and the water was not applied with the tool running. Spray water, make a cut, spray more water.
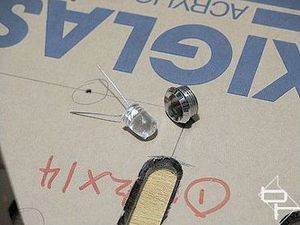
A clear 10mm LED and its chrome holder was used as the eject button. Fitting was simply a case of marking out the Acrylic panel, drilling the hole, screwing in the holder, (after cutting the threaded part to the right length), and pushing in the LED from behind. The LED legs were obviously cut off flush first. MrHaz liked the tactile feel of the switch so much I had to tell him to stop pressing it!
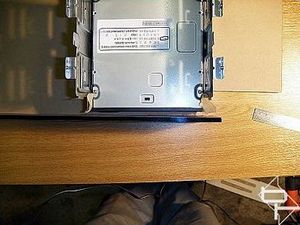
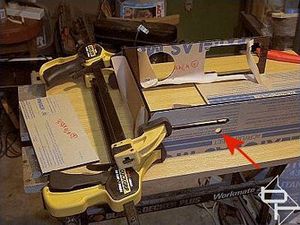
After marking out, the router was again used to cut out the hole for the PSU and a hole saw used for an 80mm cooling fan cut out. The fan cut out had its edges bevelled round to reduce air noise. (In fact all the fan cut outs on this case were given the same treatment). With all the holes the pieces making up the bottom section were glued together using IPS Weld-on #4 adhesive.
The pieces were gently clamped and then left overnight to allow the adhesive to fully cure. At this stage the cut outs in the clear top section were also done with the router, as was the dividing panel between the case top and bottom sections. You can see the partly finished divider being used as a spacer for the sides being glued.
That is exactly what happened here and so project "3GClear" was conceived. The project was a team effort. The case was designed by our very own MrHaz who also purloined the system components. The Case materials were cut and edged in America by Linear, VFD graphics coded by Cheese and the machining and assembly done by myself and MrHaz.
The case was to be made from Acrylic and be in two sections. A dark smoked bottom half housing the PSU and drives and a clear top section to show off the motherboard and 3GHz CPU. The idea being to showcase the new Intel processor at its World launch.
The project was beset with one major problem, that of time. We had one month to produce the goods. The first week was spent on the concept and basic case design. The next few weeks were spent waiting impatiently for the case materials to arrive. I ended up receiving the parts on the Wednesday night prior to the case being shipped to Intel the following Monday morning. This gave me the grand total of four days in which to finalise the design, cut the holes, assemble, iron out any design problems and produce the "modding extras" to make the case sparkle. (Actually 1 evening and 3 days). I should also mention that since the Acrylic was being shipped to the UK from America and we only had enough for one shot, one mistake and we were stuffed! Hmm, I love a challenge!
The photo record of this project is a little thin in parts, due to the pressure we were under to get the case finished in time. (Don't forget we had to install XP and test the system as well!). So any questions you may have can be answered here in the forum.
And here it is.
System specs:
- CPU - Intel P4 3.06GHz
- Motherboard - Intel 850MVE
- Ram - 512MB 1066RDRAM
- Graphics - GF4 4600Ti XP GS
- HDD - 60Gig Seagate Barracuda
- DVD - Pioneer 16X 106s
- PSU - Hiper SF-350TS
- Display - VK204-25 VFD
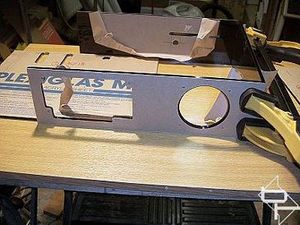
But let us start at the beginning. This is how it looked at the onset. A set of cut and edged pieces of 1/4" thick Acrylic sheet covered in thick protective paper. The second picture shows what we were aiming for.
The first thing to do was sort out the drive mounting. I used a cage from an old disused case. Before starting, I sprayed the DVDs beige facia with black vinyl dye so it would blend in behind the smoked Acrylic. Because the DVD drive used was a slot loader, marking the slot position on the front of the case posed a problem. You see the bottom section of the case which housed the drives was smoked, not to mention covered in protective paper which I did not want to remove until absolutely necessary, so cutting the slot in the Acrylic in exactly the right position was not easy. I had to devise a way to mark its position on the case.
To do that I stuck a piece of clear sticky tape over the DVD disc slot with the sticky side facing outwards. The clear tape was held in place on the drive with low tack masking tape.
Here is a close up of the clear tape with the sticky side facing away from the drive. A marker pen was used to mark the clear tape, (on the sticky side remember), along the centre line of the DVD slot at each end.
The drive was then offered up to the case front and positioned exactly. Pushing the drive so the sticky tape made contact with the paper covered Acrylic made it stick in place. Allowing me to peel the masking tape away from the drive and leaving the clear tape stuck to the paper with the slot centres marked in place. Neat eh?
It was then an easy task to set up the router to cut out the slot. Because I had marked the tape at the ends of the drive slot, it was just a matter of routing from one dot to the next. The router was also used to bevel the edge of the slot which was finally polished to give a professional finish. A brief word about routing the Acrylic would be in order here. Routers by their nature are high speed cutting tools. High cutting speed = heat = bad for Acrylic, (it melts or fractures). Routing on a lower speed to reduce the heat generated results in rough cut edges. To get around the heat problem we used water, sprayed on the Acrylic. This worked a treat!
WARNING: Water and power tools do not mix! The mains supply used was protected with earth leakage protection and the water was not applied with the tool running. Spray water, make a cut, spray more water.
A clear 10mm LED and its chrome holder was used as the eject button. Fitting was simply a case of marking out the Acrylic panel, drilling the hole, screwing in the holder, (after cutting the threaded part to the right length), and pushing in the LED from behind. The LED legs were obviously cut off flush first. MrHaz liked the tactile feel of the switch so much I had to tell him to stop pressing it!
After marking out, the router was again used to cut out the hole for the PSU and a hole saw used for an 80mm cooling fan cut out. The fan cut out had its edges bevelled round to reduce air noise. (In fact all the fan cut outs on this case were given the same treatment). With all the holes the pieces making up the bottom section were glued together using IPS Weld-on #4 adhesive.
The pieces were gently clamped and then left overnight to allow the adhesive to fully cure. At this stage the cut outs in the clear top section were also done with the router, as was the dividing panel between the case top and bottom sections. You can see the partly finished divider being used as a spacer for the sides being glued.


MSI MPG Velox 100R Chassis Review
October 14 2021 | 15:04

Want to comment? Please log in.