
P8P67 Overclocking
Intel's new LGA1155 socket is supposed to be accompanied by a new generation of BIOS, called the EFI (Extensible Software Interface). Some manufacturers have used a more familiar BIOS layout for their boards, but Asus has grasped the opportunity to distinguish its boards from the competition.We were therefore eager to enter the shiny new world of the EFI to see if we could tease some more speed out of the board. Thankfully, the EFI is particularly inviting, with a front page that enables broad, system-wide tweaks to be made easily and intuitively. A particular highlight is the boot device priority list, which uses large, clearly labelled icons that you can drag and drop into order with the mouse.
A more traditional-looking Advanced menu is also available for those who wish to fine-tune the settings, with the overclocking controls grouped into Asus’ now familiar AI Tweaker section. It’s here that the tweaking process becomes a little unusual.
Click to enlarge
When overclocking, we usually turn off EIST (Intel Enhanced SpeedStep Technology) and Intel Turbo Boost, as allowing these technologies to play around with the CPU speed on the fly can cause problems with an overclock. However, the P8P67 overclocks via Turbo Boost 2, and allows you to increase the ceiling to which the CPU boosts. This is in contrast to the more traditional approach we saw from MSI's equivalent P67A-GD65 (look out for a full review of this tomorrow), which simply lists a ‘CPU multiplier’ option.
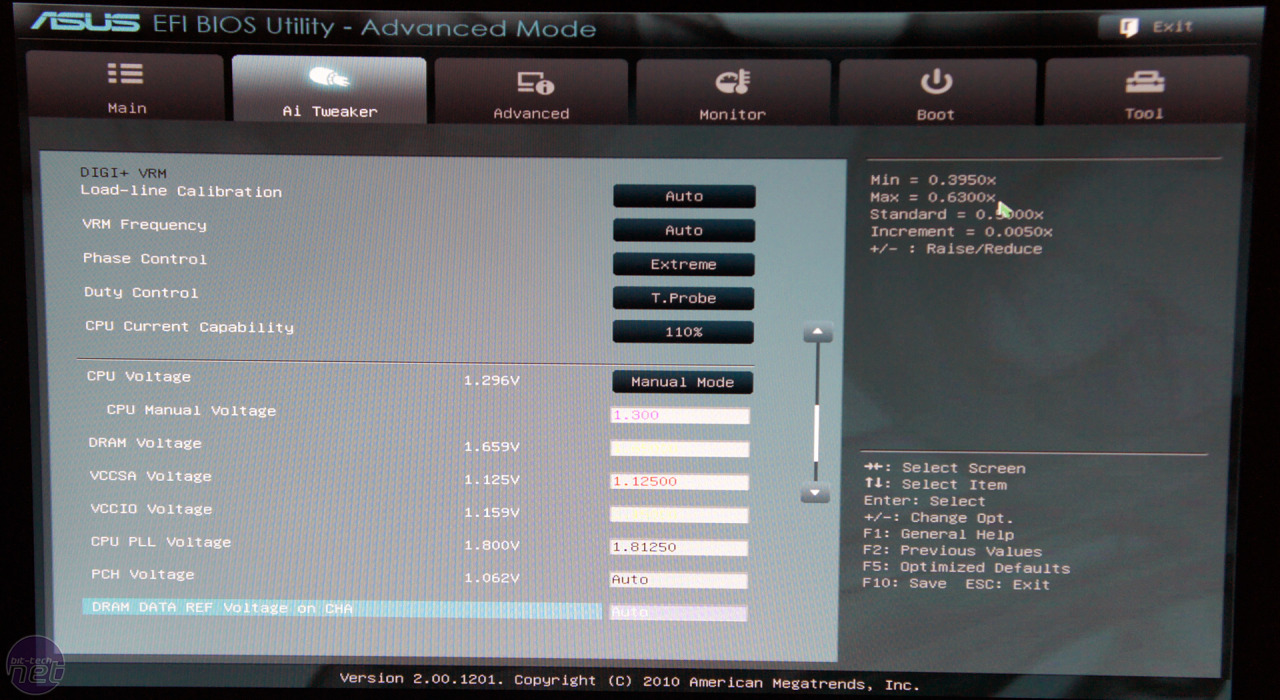
Asus' EFI is attractive and intutive.
As a result, you have to leave EIST and Turbo Boost enabled to overclock the Asus board. This meant that, even when overclocked, our CPU reduced its speed to 1.6GHz when idle before boosting to its overclocked setting when loaded. This didn’t affect the stability of the overclock, and we pushed our test CPU to a mind-blowing 4.9GHz. This required a CPU multiplier of 47x and a Base Clock of 104.3MHz.
We had to pump 1.35V through the CPU, 1.1V to the VCCSA, 1.106V through the VCCIO and 1.9V to the CPU PLL to keep this overclock stable. We also had to play with the VRM control, and finally settled on forcing Extreme Load Line Calibration. We could have achieved the same overclock with a 49x CPU multiplier, but overclocking the Base Clock a little boosted the bandwidth available for a higher level of performance.
See the Test Setup page for details on how the comparison motherboards were overclocked.
If you're struggling to overclock your LGA1155 CPU, read our guide on How to Overclock the Intel Core i5-1500K. Alternatively, for more general advice, you can read our guide on How to Overclock an LGA1155 CPU.


MSI MPG Velox 100R Chassis Review
October 14 2021 | 15:04

Want to comment? Please log in.