
The DVD drive was somewhat more difficult. The aluminium blank was cut to size and covered in masking tape, and the layout drawn on. The slot for the DVD was approximated, due to the curved top and bottom of the opening. These openings where then roughly Dremelled out, and filed back to the layout lines. Then a long process of filling the slot – testing it against the plastic bezel – filing some more etc, etc. began.
Once this was complete, a plexi plate was cut for the drive, and the aluminium, plexi and plastic drive bezel was clamped together with the hand clamps. As with the burner, 4 mm holes where drilled through all three to match the spacing of the bolts on the VFD. Then the plastic bezel was removed, and the plexi and the aluminium was bolted together, and then filed to match.
This is where it gets tricky. The DVD slot is cut with a Dremel, and then filed back to match the aluminium. The problem is that the uprights of the slot are very thin, so it’s very easy to crack the plexi when you’re going mad with a file. The best advice after ruining three bits of plexi and chucking the file across the room in disgust is to use some hand clamps or bulldog clips to hold the top piece of the assembly together, as this stops it from flexing and stressing the thin parts when filing. Oh – and don’t attempt to do it at gone Midnight.
The eject button hole was cut in the same way as the burner and also made up in the same way too. It was stuck in place with double sided tape, like the burner's new eject button too.
Another decal was designed and printed, and cut out the OHP film. The holes for the eject button and slot where left, and the decal put between the two plates and bolted together. Then the both the slot and the button was cut out by running a scalpel around each hole. Once again, use some bulldog clips on the top of the plates to hold the assembly together – other wise as the blade bites into the film, it drags it down causing the decal to wrinkle or tear.
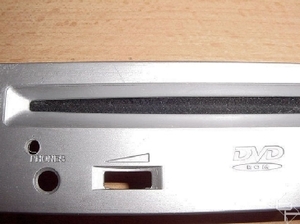
The original bezel had already been painted with some Aluminium (Code B30) coloured Plasticote brush on quick drying enamel. This stuff is a very close match to the aluminium used on the Lian, and the brush marks disappear as it dries. All of the parts were then bolted together in the same way as the burner, after the original plastic eject button was filed to give a flat surface for the aluminium and plexi one to stick to.
On this drive, no plastic needed to be removed from the back of the original bezel or from the internal structure of the drive to accommodate the nuts – but the 20mm bolts had to be cut down again, as the 6mm bolts where to short. As with the VFD mount and new power button assembly, the activity lights in both drives are only visible in normal light when the LED is lit – you can’t see the hole the light shines through.
The drives installed back in the case. They need to be slid back a touch further than usual, to get the aluminium plates in line with the Lian’s front panel, and the plexi covers to align with the VFD mount
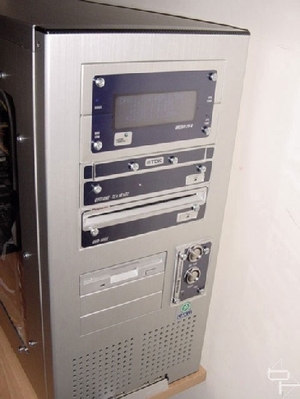
If you squint, you can just about see the VFD through the wash of the flash.
And that’s it for now. Future plans include adding some LED case lights (Blue of course) and doing an OHP Decal for the window. Oh – and probably doing some liquid cooling. But that’s for another weekend!
Once this was complete, a plexi plate was cut for the drive, and the aluminium, plexi and plastic drive bezel was clamped together with the hand clamps. As with the burner, 4 mm holes where drilled through all three to match the spacing of the bolts on the VFD. Then the plastic bezel was removed, and the plexi and the aluminium was bolted together, and then filed to match.
This is where it gets tricky. The DVD slot is cut with a Dremel, and then filed back to match the aluminium. The problem is that the uprights of the slot are very thin, so it’s very easy to crack the plexi when you’re going mad with a file. The best advice after ruining three bits of plexi and chucking the file across the room in disgust is to use some hand clamps or bulldog clips to hold the top piece of the assembly together, as this stops it from flexing and stressing the thin parts when filing. Oh – and don’t attempt to do it at gone Midnight.
The eject button hole was cut in the same way as the burner and also made up in the same way too. It was stuck in place with double sided tape, like the burner's new eject button too.
Another decal was designed and printed, and cut out the OHP film. The holes for the eject button and slot where left, and the decal put between the two plates and bolted together. Then the both the slot and the button was cut out by running a scalpel around each hole. Once again, use some bulldog clips on the top of the plates to hold the assembly together – other wise as the blade bites into the film, it drags it down causing the decal to wrinkle or tear.
The original bezel had already been painted with some Aluminium (Code B30) coloured Plasticote brush on quick drying enamel. This stuff is a very close match to the aluminium used on the Lian, and the brush marks disappear as it dries. All of the parts were then bolted together in the same way as the burner, after the original plastic eject button was filed to give a flat surface for the aluminium and plexi one to stick to.
On this drive, no plastic needed to be removed from the back of the original bezel or from the internal structure of the drive to accommodate the nuts – but the 20mm bolts had to be cut down again, as the 6mm bolts where to short. As with the VFD mount and new power button assembly, the activity lights in both drives are only visible in normal light when the LED is lit – you can’t see the hole the light shines through.
The drives installed back in the case. They need to be slid back a touch further than usual, to get the aluminium plates in line with the Lian’s front panel, and the plexi covers to align with the VFD mount
If you squint, you can just about see the VFD through the wash of the flash.
And that’s it for now. Future plans include adding some LED case lights (Blue of course) and doing an OHP Decal for the window. Oh – and probably doing some liquid cooling. But that’s for another weekend!
RELATED ARTICLES


MSI MPG Velox 100R Chassis Review
October 14 2021 | 15:04

Want to comment? Please log in.