
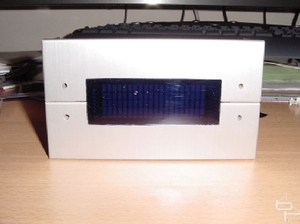
So I had the finished article – or so I thought….
I kept looking at and kept thinking it could be better. I decided to put a protective piece of plexi over the top, held on with some bolts.
The plexi was bought from Homebase – they do it in sheets about 500 X 1500mm. It was cut by scoring with a sharp Stanley knife, and then snapping - this gives a nice smooth edge. Obviously, this was done to achieve the correct ‘height’, and once more to get the ‘width’
The plexi was then held in place with a couple of these hand clamps.
4mm holes were then drilled through the plexi, aluminium and MDF in each corner. Some M4 x 20 torx bolts (Maplin Part #FT07) were then used to secure the plexi.

I was going use some spray etch on the back of the plexi to cover the LED holes, but test pieces where too light – I didn’t want to see the holes at all unless the LED was on.
Then I read Macroman's decal article, and the neurons started firing. I could do the same, but just use OHP transparencies, as the bolts & plexi would hold it in place.
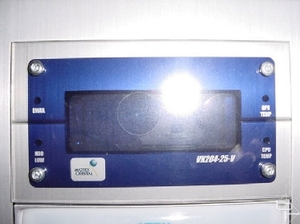
The design was done in PowerPoint – It’s all I had to hand. All I did was draw an oblong the same width and depth as the two bay coves making up the VFD mount, and kept the design within that boundary. My design had to a) cover the LED holes and b) neaten up the edges of the VFD window.
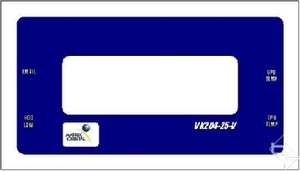
This was done with two overlapping rounded oblongs – one dark blue, the other white. After some careful measuring, they were sized so that the dark blue one sat inside the boundary with 10 mm clearance on all sides. The white one was sized to just under the VFD window size. All of the shapes where then aligned along their centres and middles.
Anything white on the decal would be clear when printed out – that’s why the centre oblong is white – otherwise you wouldn’t see the VFD very well. White text was then added for the each of the 4 LEDS, and placed on the decal so they would be central and just below each LED hole. The Matrix Orbital logo was taken from the MO site, and resized to fit. It already had a white background, but it was put on top of another white rounded oblong to match the look and feel of the decal
Finally the model number was added just under the window in the same way. The white text comes out clear just like the VFD window, but as it’s up against the bay plate the text looks as if it’s been written in brushed aluminium letters.
Once the layout was finished, the decal was printed out. I used the highest resolution I could, to prevent ‘banding’.
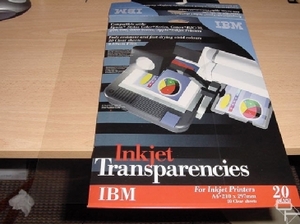
The decal was given time to dry, and then I handled it very carefully. Inkjet film does not like water – so make sure you haven’t got sweaty hands etc. before handling it yours, as the printing surface will come away, along with any ink that’s on it!
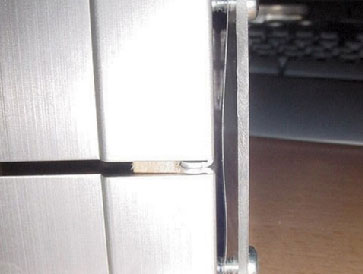
The decal was cut out along the boundary line, and then placed under the plexi. The holes where the bolts would pass through were started with a 4mm drill bit, and then the bolts were just pushed through.
I kept looking at and kept thinking it could be better. I decided to put a protective piece of plexi over the top, held on with some bolts.
The plexi was bought from Homebase – they do it in sheets about 500 X 1500mm. It was cut by scoring with a sharp Stanley knife, and then snapping - this gives a nice smooth edge. Obviously, this was done to achieve the correct ‘height’, and once more to get the ‘width’
The plexi was then held in place with a couple of these hand clamps.
4mm holes were then drilled through the plexi, aluminium and MDF in each corner. Some M4 x 20 torx bolts (Maplin Part #FT07) were then used to secure the plexi.
I was going use some spray etch on the back of the plexi to cover the LED holes, but test pieces where too light – I didn’t want to see the holes at all unless the LED was on.
Then I read Macroman's decal article, and the neurons started firing. I could do the same, but just use OHP transparencies, as the bolts & plexi would hold it in place.
The design was done in PowerPoint – It’s all I had to hand. All I did was draw an oblong the same width and depth as the two bay coves making up the VFD mount, and kept the design within that boundary. My design had to a) cover the LED holes and b) neaten up the edges of the VFD window.
This was done with two overlapping rounded oblongs – one dark blue, the other white. After some careful measuring, they were sized so that the dark blue one sat inside the boundary with 10 mm clearance on all sides. The white one was sized to just under the VFD window size. All of the shapes where then aligned along their centres and middles.
Anything white on the decal would be clear when printed out – that’s why the centre oblong is white – otherwise you wouldn’t see the VFD very well. White text was then added for the each of the 4 LEDS, and placed on the decal so they would be central and just below each LED hole. The Matrix Orbital logo was taken from the MO site, and resized to fit. It already had a white background, but it was put on top of another white rounded oblong to match the look and feel of the decal
Finally the model number was added just under the window in the same way. The white text comes out clear just like the VFD window, but as it’s up against the bay plate the text looks as if it’s been written in brushed aluminium letters.
Once the layout was finished, the decal was printed out. I used the highest resolution I could, to prevent ‘banding’.
The decal was given time to dry, and then I handled it very carefully. Inkjet film does not like water – so make sure you haven’t got sweaty hands etc. before handling it yours, as the printing surface will come away, along with any ink that’s on it!
The decal was cut out along the boundary line, and then placed under the plexi. The holes where the bolts would pass through were started with a 4mm drill bit, and then the bolts were just pushed through.
RELATED ARTICLES


MSI MPG Velox 100R Chassis Review
October 14 2021 | 15:04

Want to comment? Please log in.