
This tutorial is not the be-all-and-end-all to engraving: it is just the tricks & techniques I have developed over many years. Here are a few more tips to bear in mind:
Some things you will learn the hard way, but I can try to help out - this one that took me some time to figure out:
Think of your Dremel like you would a car: while it may be capable of high speeds, the higher the speed the more difficult it is to handle. Maximum control is had at lower speeds: the bit is less likely to skip acros the surface, and you will avoid melting the <strike>tyres</strike> acrylic/plexi you're working on.
This is a cool effect that takes some time - the results are totally worth it, but as usual, there are some things to bear in mind. Here are the steps:
Using clear Plexi, you could trace your favourite cartoon character or other source art. But be mindful of Rule #4 - you are engraving the underside of the sheet, so everything will be mirrored.
It is just a sketch you could say. (you could say it's an Etch-a-Sketch -ed)
Check the painted face for opacity by holding it up to a bright light. No light should show through. If it does, spray a bit more paint.
Be sure that the paint is fully dry before you do the final step.
Follow the same lines and patterns as before but this time you do the finishing touches and details to smoothen the lines until you are satisfied with the final effect.
There are some other ways to colour the plexi/acrylic too. You can use "sun film" or “Limo tint” that is used on cars. However, if you use that on the outside of the case that will be prone to scratching and if you do it on the engraved side it is almost impossible not to get air bubbles in the film.
1. Take your time
Don't rush your work - engraving is a time consuming process and some mistakes cannot be undone!2. Get comfortable
The use of a nice soft chair is highly recommended because you are going to be sat on it for a long time. You need to be comfortable and relaxed, so take it easy.3. Plan ahead
To achieve the best result draw the motive or pattern in advance on the case/sign or whatever you are engraving,4. Think backwards
Usually it is the inside face of a window that you engrave, so the image you are working on is the reverse of what is seen from outside the case. It is important to remember this. I have done lots of nice engravings and at the end when checking them out, the name is backwards. Not that fun after 6 hours of work!Some things you will learn the hard way, but I can try to help out - this one that took me some time to figure out:
5. Work away from yourself
If you are planning to do a straight line, move your arm away from you, not towards. That in some strange way helps a lot to get a nice straight line.6. Practice safe engraving
When you buy acrylic/plexi or even aluminium it will have some kind of protective plastic sheet or film on it. Keep that on as long as possible, since it helps to keep the surface from being scratched. Engraving will produce small shavings of your base material and they might scratch the surface when moving your hand back and forth. Blow or tip these shavings from your material at regular intervals: never use a brush as this could badly scratch your surface.7. Different materials behave differently
Acrylic plastic is soft and easy to do work with but can melt quickly if you overdo things. Plexi is a much harder material concentration is required: without a steady hand, your engraving bit can skip away from you, marking the surface as it flies out of your grasp. Aluminium is a soft metal but it behaves similarly to the Plexi: your bit has a tendency to trip away when least expected, as if it had a mind of its own. Slow and steady is the key.8. Speed Kills
The Dremel is a high-speed multi tool and when I engrave, I use it on a low speed setting to do the lines. If the bit gets too hot it will melt the plexi/acrylic. When done with the lines I put the speed up a bit but not to maximum: I usually never go over 15,000-20,000rpm when engraving. That is approximately half of the speed the tool is capable of.Think of your Dremel like you would a car: while it may be capable of high speeds, the higher the speed the more difficult it is to handle. Maximum control is had at lower speeds: the bit is less likely to skip acros the surface, and you will avoid melting the <strike>tyres</strike> acrylic/plexi you're working on.
Paint and Engraving
This is a cool effect that takes some time - the results are totally worth it, but as usual, there are some things to bear in mind. Here are the steps:
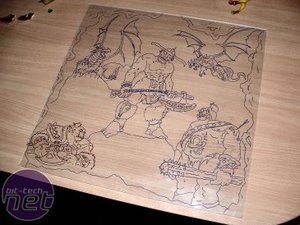
1. Sketch up
Draw your motif or pattern:Using clear Plexi, you could trace your favourite cartoon character or other source art. But be mindful of Rule #4 - you are engraving the underside of the sheet, so everything will be mirrored.
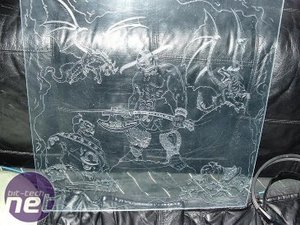
2. Etch up
Engrave it but at this moment, you do not need to put any finishing work or fine details:It is just a sketch you could say. (you could say it's an Etch-a-Sketch -ed)
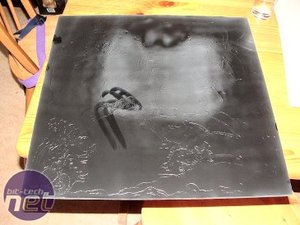
3. Spray paint
Remove the protective layer on the side that is engraved but try not to scratch it. Then paint it. I use spray cans, plastic paints or paints made for plastic surfaces and don't forget that you are painting the side that should be on the inside of the case.Check the painted face for opacity by holding it up to a bright light. No light should show through. If it does, spray a bit more paint.
Be sure that the paint is fully dry before you do the final step.
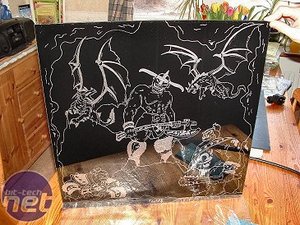
4. Re-etch, details
After the paint is dry and you are satisfied you have 100% coverage, you can start to engrave the whole thing again.Follow the same lines and patterns as before but this time you do the finishing touches and details to smoothen the lines until you are satisfied with the final effect.
There are some other ways to colour the plexi/acrylic too. You can use "sun film" or “Limo tint” that is used on cars. However, if you use that on the outside of the case that will be prone to scratching and if you do it on the engraved side it is almost impossible not to get air bubbles in the film.


MSI MPG Velox 100R Chassis Review
October 14 2021 | 15:04


Want to comment? Please log in.