
Working with what you've got
Alright, so you have ordered your acrylic. You've got a couple neon pieces, a couple opaque blacks, maybe some clear...now what?Now, it's time to take those lovely square or rectangular sheets and turn them into something useful! But how? Well, we can cut it, we can route it, we can bend it, we can do all sorts of things to acrylic that you couldn't do with metal – at least not without a full CNC router and lathe at your disposal...and how many of us have that?
The shaping ability is probably the second biggest reason to choose acrylic as your material of choice, outside of its colour range. After all, not everybody has a CNC or metal brake in their garage – in fact, most people don't.
So, let's take a look at just a few of the ways you can work with acrylic to make it fit your needs...
Cutting
Cutting acrylic can be a daunting task. Reading around online forums, you'll likely hear every horror story in existence. Cut too fast and melts. Cut with too big of a blade and it splinters or shatters. Cut extruded stuff and it turns to nothing more than spiderwebs and shards. And then there's the melting...The very odd thing about all of this is that very few of these horror stories weren't preventable simply by choosing the right cutting tools, many of which you can find lying around in your nearby woodshop or garage. It really is fairly simple if you just plan ahead.
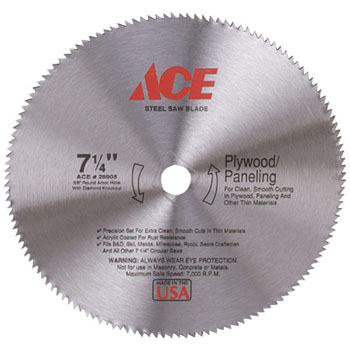
Sawblades for acrylic should be fine-toothed
and even, like plywood panelling or metal blades.
The first thing you need when cutting acrylic is an idea of what kinds of cuts you will make. Much like dealing with wood, cutting acrylic is all about planning ahead.
- Straight cuts – For straight cuts, a table saw or circular saw with a fence are the best way to go. You should use a very fine-toothed blade such as a plywood panelling blade that fits your saw. If you have the option of speed control, slower is better.
- Short, curvy cuts – Short, curvy cuts are best done with a band saw or a scroll saw, depending on the size of curve you need to cut. If you're working with small pieces like lettering, drive bays, etc, a scroll saw is just about as close to perfect as you can get. For bigger pieces with fancy cutting, a band saw could be more appropriate. Either one should use a fine-toothed metal blade if possible.
- Long, curvy cuts – This is where acrylic starts to fall short. Many modern jigsaws are too fast for cutting acrylic without melting it. It's well worth looking into the possibility of trying to find a hybrid of the above methods to make these types of cuts.
No sawblade that cuts acrylic should have a rake of any large degree, nor should teeth be anything but evenly spaced and short – so if your blade is wavy, large-toothed or varied, you need to find a new one. Otherwise, don't be surprised when the acrylic looks chewed up after the cut! There are such things as acrylic and plastic cutting blades which are (of course) optimally suited for the purpose, but I've honestly found that the above tips create excellent cuts with no special tools.
Rounding, routing, and other sundry tasks
Sometimes you're not happy with a piece of acrylic looking, well, like a piece of acrylic. Sometimes, it should have shape. And why not? What, you didn't think acrylic takes shaping well?You can't exactly run a jack plane over the edge of it and expect to get very far (that poor plane), but a good old plunge router works wonders – particularly on a table. Set the bit depth to the thickness of your acrylic and you're on your way! Always make sure to route the exposed acrylic directly, though – don't let paper or plastic backing remain on it for this step.
Router bits aren't the cheapest thing in the world, but if you already have them on hand then you can make some great edges on thicker acrylic. It's a technique that's not seen in many mods to date, and it's easy as can be!
If you need to round a corner, you should decide exactly how rounded it needs to be – a scroll saw is again the best tool for the job. However, if you have access to a drum sander, it's possible to round an edge slightly by using that. Don't try to go for some massive curve though, or you're likely to do one of two things – melt the acrylic, or go through a lot of sanding drums.
Really, sandpaper should only touch acrylic for one of two reasons, both of which aren't covered until you flip the page. I've tried it on a big corner once when I was without access to my scroll saw, and found that I went through three sandpaper drums before I was done – just to find that I'd melted enough of the acrylic that the corner was now thicker than the rest of the piece. But if you need just a tiny little rounded edge, a drum sander will do the job.
Bending
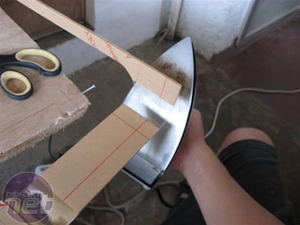
Bending has been done using everything from ovens to irons
– use a heat gun for best results!
Acrylic is usually bent in one of two ways – with a strip heater for sharp bends , or a heat gun for longer, gentle bends. I've seen people use everything from an oven to a hair dryer to an iron and do the job well – but honestly, heat guns are cheap, and if you work with acrylic for long then you will find one to be a necessity.
Strip heaters are rarely seen in modding because they're a specialty tool akin to a metal brake – unless you do this type of work frequently, odds are that you won't need one. But almost any bend can be done by a heat gun and a form *below* the bend.
If at all possible, the form should go the whole width and length of the bend (i.e., don't bend over two rails at the edges or the middle can sag). Clamp the acrylic without backing paper to the form, and begin passing the heatgun evenly over the top of the bend. As you see the acrylic droop over the form, move the heatgun down to the next part of the bend. Don't let the heatgun stay in one place too long, and try not to cover the same spot over and over.
By taking your time and bending "row by row," you'll find the acrylic takes to the form evenly and without cracking or odd warping.
RELATED ARTICLES


MSI MPG Velox 100R Chassis Review
October 14 2021 | 15:04

Want to comment? Please log in.