
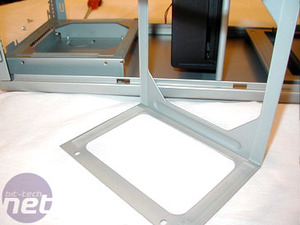
Assembly - I need that beer now...
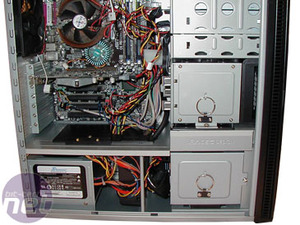
I want to say this was easy. I really do. But what you are about to see is explanation of the only complaint I could genuinely have with this case -- the cable routing is a nightmare. Ladies and gentlemen, grab yourselves a beer, you're going to need it. That said, let's begin...Normally, I would install the PSU first to do behind the motherboard tray cable routing. With this case, I tried that. So now you don't have to. Start with the motherboard. Honestly.

The PSU gets placed into its frame, then the frame screwed to its base. So far, so good. Then, the wires must be fed up through the door to the upper chamber. If you're anything like me, you have a quiet power supply to back up your quiet system (this one is a Seasonic S-12 430). My PSU is unsleeved, as you can see - make sure yours is properly sleeved. If there were a quiet, high-efficiency modular PSU, I would be taking advantage of it right now.
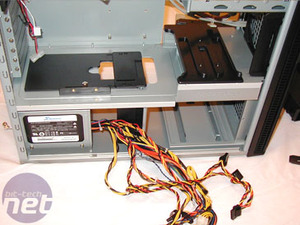
Since my PSU only has two strings of normal molex connectors (the other two are SATA and various motherboard connectors), things get even worse. One needs to route into the lower HDD bay, so it has to go up into the main chamber, then back down into the HDD chamber. The other needs to power my two CD drives. And let's not forget the two SATA drives, which I will place in the upper bay.
Then, there are all three of the fans to contend with, one of which is in the lower chamber. Guess that fan power line is coming up too, along with the 24pin mobo header and the 4 pin breakout. Phew, that's a lot of cables. . . and a lot of mess. Again, sleeve 'em if ya got 'em. It really would have made life SO much simpler.
Also, if you don't double check before starting your system, you'll end up with one or more of your wires in the big 120mm fan in this lower chamber, which makes things anything from silent (or worse, breaks the fan).

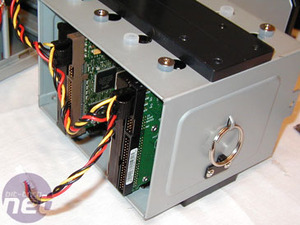
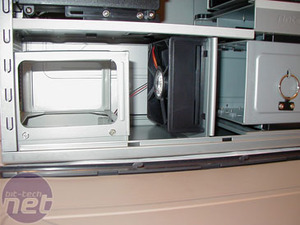
On to the hard disks next, because I needed something easy. The Bit Tech media server currently houses four drives, so I chose to make use of both the upper and lower bays. However, it is worth noting that the lower bay is preferable for fewer drives if you opt to use the lower chamber's fan, which will pull air directly over the hard drives to be exhausted via the PSU. This will also keep the heat developed by the hard drives far away from the CPU.
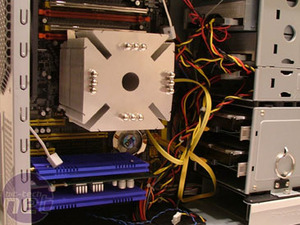
Then, the motherboard was installed. This part was easy, as I connected all the pinouts from the front panel to the mobo before commencing. Fitting all this under the massive tree-trunk of cables passing through the center of the container was a bit more difficult, particularly with the large Scythe Ninja heatsink.
The graphics card and CD drives went in simply enough, especially since the CD drives go in from the front. You don't realize how much of a blessing this is until you think of systems with rails in the back, and realize you'd have to pull the entire case bare to get another drive in or pull one out.
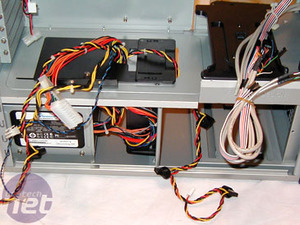
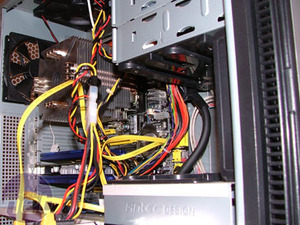
Back to the power cables to wire all this up. Grab your beer, folks, we're goin' for a wild ride. With only 3 connectors on one line to work with (remember, the other whole line had to be buried in the HDD area), I had a bit of a struggle ahead of me. First, the fans needed power. Since each of them was on a pass-through molex, I put one on each of the connectors on the line.
Then, I put the connectors to each of the two CD drives and split the third for my SATA hard drives. Maybe this wouldn't be such a problem with either (a) more molex lines, or (b) 37 long splitters. No matter, you can see the mess that this quickly became. When you sleeve your PSU, save some extra for the Tri-Cool power lines. You'll need it. The thin little wires are unbraided, and are inclined to separate wildly as soon as you remove their twist-ties.
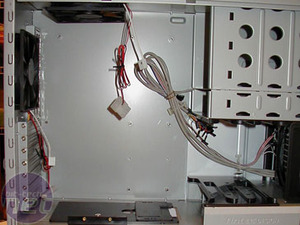
All assembled, it creates a beautiful mess. Sleeving would help this project immensely, as would a modular power supply to remove unnecessary wires. As a side note, the extra wires that I had from my supply conveniently tucked up above the PSU, out of the way. As luck would have it, there won't be a window to see the mess with...as mentioned, cutting through the side panels would ruin some of their acoustic properties.


MSI MPG Velox 100R Chassis Review
October 14 2021 | 15:04


Want to comment? Please log in.