
Installing the Freezone Elite
I need to start this off with a disclaimer. I have not installed the Freezone Elite into a chassis per se, in a manner similar to what an average person would. This is because the product doesn't really fall in line with standard cooling – it's competing directly with watercooling, and as such I wanted to keep the hardware similar.So, this system was set up on my test bench instead, which is built on the rather awesome Torture Rack by Danger Den. I found, over the course of my install, that the Freezone Elite is not so forgiving to this unusual case arrangement. So, you will see pictures of the unit held up by none other than the equally fantastic cardboard box. Aside from simply screwing the main unit to the chassis, the rest of the installation is not really affected.
Prepping your case
The only thing that you need to consider when purchasing the Freezone Elite is whether your case has a 120mm fan slot below the PSU. Most enthusiast tower cases do. If not, be prepared to cut one – the Freezone Elite is designed to be Plug and Play, and part of its attractive, self-contained nature is that it doesn't have three feet of tubing for the CPU block.You will have to remove your motherboard from the case in order to properly install the block, as you remove the traditional retention bracket for either AMD or Intel systems. In the holes, you'll put four stand-offs that will hold a set of coat-hanger like wire retainers that should match with the CPU block. On my system, I already have four screw-posts for watercooling blocks, so I skipped this step. The end result is the same.
The MTEC control centre will also need a home, but it's thin and fits most places. If you can run it out the back of your case to the outside, it will be not only visible (in case of troubles) but make cable routing easier as all the wires protrude from right around the bottom of the fan assembly on the unit.
Mounting the waterblock
Here comes the fun – if there is anything to complain about when it comes to build installation and quality, it is this step. The CPU block is attached via coat-hanger like wires (on both Intel and AMD) that are meant to cross over the centre of the CPU block, which is raised and notched to fit them.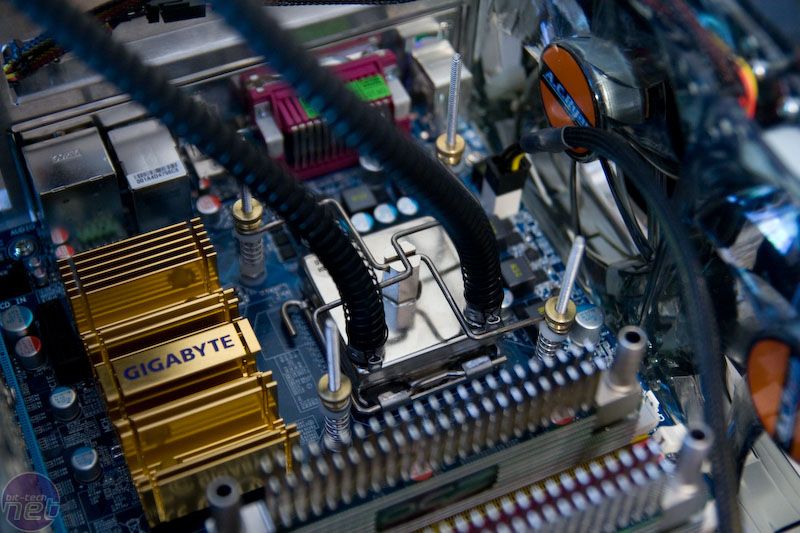
Mounting the block is quite easy...
once you figure out which wires to use.
Probably the most fatal faux pas that this product commits is the included thermal paste. There is enough on here to drown the elephant that I could have held down with the wires. It is actually spread in a handy square across the block, but that square is more than one and a half times the size of the CPU die – which means that the stuff gets everywhere. The layer is far too thick and I'm not even sure of the quality of paste, as you will see in my results. (NOTE: CoolIT has informed me that this is actually Arctic Silver Ceramique)
To be honest, this is an enthusiast product – there is absolutely no reason to provide a gigantic, over-sized layer of thermal paste, crappy or not. At this price, I'd expect a small tube of Arctic Silver Ceramique or AS5 compound and an extra step in the manual.
Mounting the system
Once you've cussed, fussed and settled on the block installation, you can move on to the system itself. Not that these can be done in vastly separate steps, mind you, as the short tubing and leads require you to pretty much lean the unit on the motherboard while you install the block. For this portion of the install, I can give mostly praise, but I have one issue that is actually quite a serious one. You raise the unit to the 120mm fanhole on the back of your case. You shove four bolts through, attach nuts, and you are done. My gripe? I wanted some fan grommets. When you're spending this kind of money on a product like this, there should be no details overlooked. By bolting something this large to the system, you're begging for vibration problems, and this fan is by no means silent to begin with. It should be in the box.
Finally, all that's left is connecting the system to the MTEC Controller and the Controller to your PSU and USB. The manual gives detailed instructions, though honestly aside from knowing which wire is which (they really should be labelled), it's not difficult. The MTEC controller itself comes with Velcro on the back to put it anywhere in your case, which is a nice inclusion. Now, when you fire up your system, you should see the controller light up for a second, and then go down to an error light on the "B" side (as we don't have a second unit) and a power light.
Again, I think there were slight but important oversights – cables should be sleeved, and the wires should be tagged clearly. What if I lose the manual? I'm not going to remember that a white shrink wrap means the pump power. And if the unit is not going to contain a larger proprietary plug design to connect into the MTEC Controller, I understand the plugs not being sleeved together. After all, they'll be connected all over the motherboard and power headers. But surely they should be sleeved individually, then?
Well, now that we have the unit installed in our chassis (or, well, on my cardboard box for testing purposes), let's see how she flies, eh?
RELATED ARTICLES


MSI MPG Velox 100R Chassis Review
October 14 2021 | 15:04


Want to comment? Please log in.